Magic Nodes
Version 6.0
- MediaMonkey v2-4 Add-on - by Zvezdan Dimitrijević
This is information about the enhanced version of Magic Nodes add-on for MediaMonkey v2.x-4.x. The freely available version of this add-on is already the largest and most complex MediaMonkey add-on with 600 KB of code (not to mention 100 KB+ in masks that are full of SQL queries), but the enhanced version is more than two times larger and it has added many very useful options. However, not matter how complex it is, its usage is now even more simpler.
If you are interested about my other add-ons for MediaMonkey, you could visit this page.
Added: ability for the Choose Magic Node dialog box to be modeless when the corresponding option is turned on in the Options dialog box, which allows much easier navigation;
Added: ability to insert (load/import) masks at the selected row in the table in the Manage Magic Nodes dialog box, which allows much easier and faster movement of multiple masks in the list than using the Move Up/Down buttons that are still limited on a single mask; if no row is selected, the loaded/imported masks will be added to the end of list as it was only possible in the previous versions;
Added: Save/Load buttons to the Manage Magic Nodes dialog box that behaves similarly to the Copy/Paste options by saving/loading masks to the intermediary .ini file;
Added: ability to export/import masks from/to the opened .ini file in the Manage Magic Nodes dialog box, i.e. to export/import masks from one external .ini file to another;
Added: combo box with options for sorting of masks in the Manage Magic Nodes and Choose Magic Node dialog boxes (previously only available in the context menu of the table);
Added: temporary sorting of rows in the Manage/Choose dialog boxes without changing their order in the .ini file (you could click on the table header in the Manage dialog if you want to save masks with the chosen order as in the previous versions);
Added: ability to check on/off multiple consequent rows in the Manage dialog box using the Shift key;
Added: resizing/changing of the Next/Prev, Move Up/Down and Export/Import buttons in the Manage Magic Nodes dialog box when its size is horizontally reduced too much;
Added: Multi Publisher field, changed Publisher to be multi-item field [MM4];
Added: DateTime played/last played/added/modified and Date last played/added/modified as arguments for Sort by/Statistics qualifiers;
Added: is known/unknown operators to the combo box in the Filter group on the Mask Settings dialog box (only for linked fields);
Added: Min/Max/Top SQL queries mode: Limited (old) / Basic / Enhanced option that determines how to construct SQL queries for masks with the Min/Max and Top qualifiers;
Fixed: Top qualifier (finally!);
Fixed: Unknown node for Playlist MN field;
Fixed: Show ordinal numbers (Show rank qualifier) for Magic playlists (nodes in the Playlists branch of the Media Tree) in some specific situations;
Fixed: Date played field used in Sort by/Statistics qualifiers;
Fixed: grouping of nodes with prefixes (The, ...) when the option Move prefixes to the end... is turned on;
Fixed: resizing of fonts of many controls in dialog boxes, which are based on web browser control, depending on the Font size chosen in the Skin sheet of the Options dialog box;
Fixed: resizing of dialog boxes and blank web browser controls in some events (after hibernation, switching system user/system color depth, changing skin) with the skinned version of the program on Windows Vista and later;
Removed: First/Last child of Web node, since that ability is not supported by the program;
Improved: look of the "..." and "^/_" buttons in the Mask Settings dialog box;
Improved: speed of many things (e.g. opening of dialog boxes, expanding of group nodes, ...);
Added/Improved: many masks.
v5.2 - 2018-09-30
Added: drop down Find list with the last 5 used terms in the Manage Masks/Choose dialog boxes;
Fixed: very slow startup that is caused by Windows 10 Update and its Windows Defender Real-Time Protection;
Fixed: duplicated display of files in Art with Details mode in some MM versions;
Fixed: error with Custom fields having Regex reserved characters;
Added/Improved: many masks.
v5.1 - 2017-03-07
Added: Add button to the Edit Mask dialog box which allows creating new masks based on existing ones from the Manage Masks dialog box;
Renamed: OK button to Update/Rename in the Edit Mask dialog box;
Added: ability to create groups with radio buttons in the adjustment dialog box using <Else Caption="..."> tag (the good news: groups could be nested, the bad news: groups could contain only two radio buttons);
Improved: <If> tag used in adjustment dialog boxes;
Added: several new ways of sorting masks in the Manage Masks dialog box from the table's context menu;
Improved: speed of expanding of MN groups in many cases.
v5.0.8 - 2016-04-21
Fixed: typing numerical values on keyboard in SpinEdit controls on adjustment and Mask Settings dialog boxes (functional only in MM v3.1.2.1289 or higher);
Fixed: unnecessary display of dialog box on start-up asking if you want to install new masks after automatic adjustment of clock caused by switch in daylight saving time;
Fixed: format of table on the Manage Masks dialog box for unskinned version and unsupported skins.
v5.0.7 - 2015-10-15
Added: opening of the add-on's Web page on click at the version number in the Options dialog box.
v5.0.6 - 2015-07-22
Improved: work with MN created playlists, fixed errors on switching tabs while creating playlists;
Fixed: Refresh Magic Playlist menu command (broken since 5.0.1).
v5.0.5 - 2015-06-18
Added: new fields for drag & drop operation (Title, Original Title, Comment and all fields with Multi prefix).
v5.0.3 - 2014-10-26
Fixed: error with the Top qualifier used on the first level of local sub-nodes;
Fixed: enabled state of the Refresh Magic Playlist menu option for global nodes;
Fixed/Added: some masks in the Random group.
v5.0.1 - 2014-09-12
Added: possibility to expand the [All] nodes getting the same sub-nodes as the other local nodes on the same level, e.g. with the mask Test\<Artist|All:Yes>\<Album> if I double-click the All node on the artist level I would get sub-nodes with all albums from all displayed artists (affected by Filter, Min, Max, Top, Unknown and Sort by options);
Added: possibility to open the Manage Masks dialog box while the Settings dialog box is still opened (if the corresponding Modeless option is turned on in the Options dialog);
Fixed: display of nodes on the second or greater level in depth and statistical values for such nodes containing Min, Max, Top and Unknown qualifiers;
Fixed: display of values using Sort by qualifier in MN created playlists;
Fixed: positioning of nodes in the tree when their corresponding mask are added;
Fixed: corruption of MM database with all playlists destroyed manifesting on some very specific conditions;
Added/Updated: many masks, especially those that could use the new Adjust Magic Node option, also improved all masks containing Filter for Complete Albums which allows more reliable displayed files from multi-disc albums (assuming that the Disc Number field is correctly filled).
v5.0 - 2014-04-19
Added: new MM4 fields: Actor(s), Producer, Season #, Episode #, Episode # - Title, Parental Rating, Framerate, Resolution, Video Width, Video Height, Bookmark, Start Time, Stop Time, Skipped #, Type;
Fixed: all date/time fields taking UTC in account [MM4];
Added: <Multi Album Artist with Album> field that is same as old <Album Artist with Album> field;
Changed: <Album Artist with Album> field now displays as many nodes as there are album artists on each album;
Added/Changed: <Multi Artist with Title> and <Artist with Title> similarly to the previous two mentioned fields;
Added: possibility to specify custom fields as <Custom X> where X could be between 1 and 5, which eliminates errors after renaming some of these fields in the Options dialog (the old way for writing masks using <Renamed_custom_field> is still supported, but not recommended);
Added: <AutoPlaylist> and <Any Playlist> fields (old <Playlist> field still displays only static playlists);
Added: default order of the files with <Playlist> field that is same as it is in the corresponding playlist;
Added: Auto-child of - Playlists option to the Position combo box and the corresponding Position:Auto child qualifier construction used in combination with Child of:Playlists, which allows MN created playlists that are automatically refreshed whenever you select them similarly to the auto-playlists (the playlists created with the old Child of - Playlists option require manual use of Refresh Magic Playlist command when you want them updated);
Fixed: display of values using Sort by qualifier in MN created playlists;
Improved: Sort by and Statistics qualifiers that could have specified fields without aggregate function, e.g. Sort by: Track number;
Improved: two or more fields (with or without aggregate functions) could be displayed in the front of the main field using Sort by qualifier (until now it was possible to specify just one field for display using Show sort key qualifier);
Added: possibility to get slightly more customized node captions using the previous two improvements with Sort by qualifier for specifying fields that would be in the front of the main field (prefixes) and Statistics qualifier for specifying fields that would be after the main field (suffixes), e.g. the caption "Season#, Episode# - Title (Length)" could be get with <Title|Sort by:Season number, Episode number|Statistics:Length>
Added: sort of files in the filelist using Sort by qualifier applied to the global MN node, e.g. Test|Sort by:Album, Track Number\<Artist>
Added: Random as a quasi-sorting order when sorting files, e.g. Sort by: Genre Random, Artist, Album Random, Track Number;
Added: Concat aggregate function for Statistics qualifier, e.g. Title|Statistics:Concat(Playlist) will display concatenated all static playlists in which specified title appears;
Improved: Trim qualifier which could accept negative values when the SubStr qualifier is different than 0, allowing that the Abs(Trim) characters preceding the SubStr-th character of the field are displayed;
Added: possibility to specify Filter qualifier with the local MN nodes implementing HAVING part of SQL query (until now Filter was used only with the global nodes implementing WHERE part of SQL query);
Added: possibility to specify Filter qualifier to the group MN nodes, i.e. the same filter could be applied to several MN nodes belonging to the same group (the group filters are AND-ed with global filters for particular MN node);
Improved: all group nodes could display files implementing UNION query, independently of their level (until now display of files was possible only with the group nodes that are direct parents of the global nodes);
Improved: Refresh Magic Playlist command that could be applied to the group and local MN playlist nodes (until now that command was used only with the global MN playlist nodes);
Improved: Delete Magic Node command could be applied to the group MN nodes which allows batch deleting of all contained MN masks/nodes;
Improved/Fixed: renaming of the group MN nodes in the Tree;
Added: possibility to expand the [All] nodes getting the same sub-nodes as the other local nodes on the same level, e.g. with the mask Test\<Artist|All:Yes>\<Album> if I double-click the All node on the artist level I would get sub-nodes with all albums from all displayed artists (affected by Filter, Min, Max, Top, Unknown and Sort by options);
Added: option to drag&drop tracks to the [Unknown] nodes which clears the corresponding field/tag, e.g. if I have Test\<Artist> mask and if I drag& drop tracks to its Unknown sub-node I would get cleared the Artist tag in those tracks;
Fixed: display of nodes on the second or greater level in depth and statistical values for such nodes containing Min, Max, Top and Unknown qualifiers;
Fixed: display of nodes that are now updated when related MM filters/collections are changed;
Fixed: positioning of nodes in the tree when their corresponding mask are added;
Allowed: hotkeys for any MN masks, they are not limited only to the first 100 masks anymore;
Added: option to display toolbar buttons for specified masks which allows bringing focus to the related nodes with possibility to choose display of icon or text;
Added: display of ICO files in Magic nodes and/or related toolbar buttons;
Added: Select button to the Settings dialog box which brings focus to the related node of the current mask;
Added: Add button to the Settings dialog box that is separated from the Update/Rename button which allows adding/having several nodes with the same Caption within different groups/collections;
Added: multi-line text box mode for editing MN masks in the Settings dialog box that is toggled with the "^" / "_" button;
Added: Find option with the Next/Prev buttons to the Manage Masks's dialog box (improved old Export/Import dialog) which allows searching for mask that contains the specified text;
Added: Match case and Regular expressions options for use with the Find option;
Added: context menu to the table in the Manage Masks dialog box with some options usable in that dialog box (Copy, Select all, Print, Word Wrap, Match case, RegEx);
Added: Add/Edit button to the Manage Masks dialog box;
Added: possibility to open the Manage Masks dialog box while the Settings dialog box is still opened (if the corresponding Modeless option is turned on in the Options dialog);
Added: Choose Magic Node dialog box similar to the Manage Masks dialog for searching and selecting mask that is opening from the Settings dialog box using the "..." button;
Improved: speed of moving masks up/down in Manage Masks and Settings dialog boxes;
Added: option Ignore prefixes when sorting by: to the Options dialog box for specifying which fields should have ignored prefixes;
Added: possibility to specify MN node for Auto-DJ;
Improved: the context and main menus with better organization of the existing and new commands;
Added: Adjust Magic Node command to the menus that allows much easier adjustment of parameters of existing masks than modifying them in the Filter area of the Settings dialog box (more information about that option in the following sections);
Added/Updated: many masks, especially those that could use the new Adjust Magic Node option, also improved all masks containing Filter for Complete Albums which allows more reliable displayed files from multi-disc albums (assuming that the Disc Number field is correctly filled).
For MediaMonkey 3.0 or higher - just double-click on the MediaMonkey.xx.mmip file; if you are on Vista or newer Windows and you got "Product installation error", make sure you have MM3 set to "Run as Administrator"; if you downloaded the installation package with IE and it changed its extension to a .zip, you should first change it back to a .mmip.
For MediaMonkey 2.x - rename a .mmip extension to .zip, extract MagicNodes.vbs and MagicNodes.ini files to the MediaMonkey's "Scripts\Auto" folder and restart MM program.
Note: The MagicNodes.ini file is used only after the installation. During its work, the Magic Nodes add-on stores masks into the MediaMonkey.ini file.
If you are upgrading this add-on from an old version, it is strongly recommended that you follow these steps:
1. make a backup of your own created masks using the Edit / Magic Nodes Export/Import dialog box (pre-v4.3), or Edit / Magic Nodes / Manage Masks dialog box (v4.3 or higher);
2. uninstall the old version of the add-on and choose Yes when you are asked if you want to remove add-on settings;
3. install the new version of the add-on;
4. import your own created masks using the Edit / Magic Nodes / Manage Masks dialog box.
This way, you will always have the latest and updated masks correctly sorted. If you don't remove the old settings (together with masks), this add-on will check the names of masks during the installation and, if they are same as the old ones, they will be skipped or relocated.
Nodes are the elements of the navigation tree structure of the MediaMonkey interface. Magic Nodes add-on allows a simple way of creating new nodes to help you manage your music library. The nodes created by Magic Nodes add-on ("Magic nodes") are defined using masks which are loosely based on the way that MediaMonkey auto-organize works. The masks that represent the Magic nodes could be typed from scratch or they could be created using controls in the Mask Settings dialog box.
If you want to type masks from the scratch or just to understand their structure, it is recommended that you read the PDF manual written by Rick Parsons. It is outdated since it covers only 1.7 version of the add-on which was one of the latest versions without the proper GUI, but it explains many things needed for understanding of this add-on. The things covered by that manual will not be mentioned in this section, but you could rather find here the explanation how to use the commands and options of this add-on that you could find in its GUI.
Magic Nodes add-on could be used by the beginners as well as by very advanced users, there are at least 3 levels of difficulty:
1. The beginners could use add-on just by navigating through the Magic Nodes branch of the Media Tree panel. You could find there over 400+ different nodes that could be useful for you without any additional adjustment, e.g. you could get displayed "Files with the Artist name on the begin of the Filename", or "Files rated X stars or more from Album Artists that haven't played last Y days", or "X random files from each Genre which has Y or more files and played more than Z times".
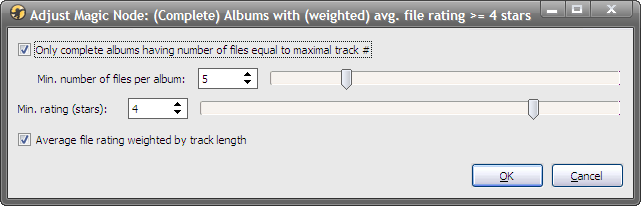
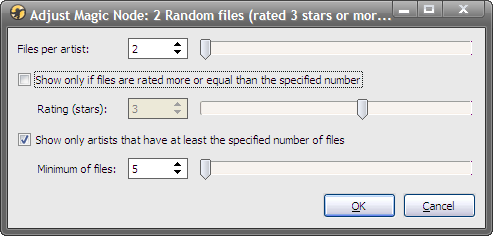
2. With many nodes and their corresponding masks there is a possibility for their adjustment using the new Adjust Magic Node command from the menu - just select the wanted node, choose the mentioned command and you will get one dialog box where you could tune some parameters of that node. For example, with the node "Artists with at least X (complete) Albums having at least Y files where all files are rated Z stars or more" there are 3 parameters: X (number of albums), Y (number of files per album) and Z (minimal rating of files). Actually, that node has one parameter more which could be toggled using one check box - "Complete Albums", but more about that you could find in the section dedicated to the Adjust Magic Node command and its related tags.
3. Somewhat more experienced users could create their own masks to get nodes that are different than those that are included with the add-on. Mask could be very simple as it is Test\<Genre>, but also very complex like the mask "Artists with at least <ID:1> (complete) Albums having at least <ID:3> files, all files rated <ID:4> stars or more" that is located in the "Artist Ratings" branch of the Magic Nodes.
There are three different ways to edit any existing mask and its corresponding node:
1. choose the Mask Settings item from the Edit / Magic Nodes menu, then choose the wanted mask from the Caption combo box, edit it and click on the Update/Rename button.
2. choose the Manage Masks item from the Edit / Magic Nodes menu, then click on the number of the needed mask from the "#" column, edit it and click on the Update/Rename button.
3. right-click on the corresponding node in the Media Tree panel, choose Edit Magic Node command, then edit the mask and click on the Update/Rename button.
If you want to create a new mask based on an existing one, you should choose the Add button on the bottom of the dialog box instead of the Update/Rename in any of the previous 3 methods. However, if you want to create an entirely new mask, you could use the Magic Nodes Settings dialog: click on the New button, type some text in the Caption combo box, set some fields and its qualifiers and click on the Add button.
There are also three different ways to delete an existing mask:
1. choose Edit / Magic Nodes / Mask Settings, then choose the mask from the Caption combo box and click on the Delete button on the bottom of the dialog box.
2. choose Edit / Magic Nodes / Manage Masks, then select the mask(s) in the table and click on the Delete button.
3. right-click on the corresponding node in the Media Tree panel and choose Delete Magic Node command.
The Magic Nodes commands could be found in the Edit menu of the main menu or in the context menu of the Media Tree. The first group of commands from the Magic Nodes sub-menu, including Edit Magic Node and Delete Magic Node, is enabled only if you have selected a global Magic node, while the remaining commands could be executed even when none Magic node is selected, e.g. Mask Settings. However, in some particular cases, some commands from the first group are enabled even with the selected group or local Magic Nodes' sub-nodes.
Mask's syntax
The description about that what is the "global" Magic node could be found in the mentioned PDF manual. Here is just a quick reference about the syntax of the Magic Nodes' masks where "[]" indicates optional and "*" indicates repeat 0-n times:
Each additional "\" indicates the start of a new hierarchical level in the tree. The every level of nodes begins with "<" and ends with ">" except the global level.
As you could see, there are 3 different types of sub-nodes in the Magic nodes: group, global and local nodes. Every Magic node contains just one global node which is mandatory, while group and local nodes are optional and there is no limit on their number of hierarchical levels.
The global node is represented by its Caption that you want displayed on the node. The local nodes represents a hierarchical levels under the global node that could display values of the specified predefined fields. The group nodes could help in better organization of the related Magic nodes in a similar way to the MediaMonkey's Files to Edit group. One or more Magic nodes could be placed inside of one group, and groups could contain additional levels of sub-groups.
For example, If I have mask <Group|Name:Tests>\Artists\<Artist>, the node with the name "Tests" is the group node, the node with the caption "Artists" is the global node, while its sub-nodes with the names of the artists are local nodes.
Every node in the mask could contain additional optional qualifiers separated by the "|" character, while the group nodes have also one mandatory "Name" qualifier. With the qualifiers you could specify behaviour of some node, e.g. which part of the field should be displayed or how sub-nodes should be sorted.
Menu
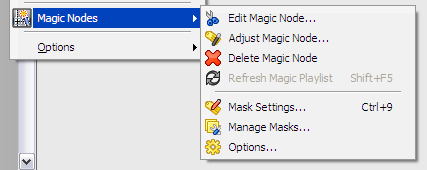
The Magic Nodes menu contains the next commands:
Edit Magic Node - it is enabled for the global and local nodes, but not for group nodes. If you choose this command you will get opened dialog box that is very similar to the Magic Nodes Settings dialog box, but it contains just Add, Update/Rename and Cancel buttons on its bottom and it doesn't have a possibility to choose the mask for editing, i.e. this dialog box allows modifications of the mask only for the selected node.
Adjust Magic Node - it is enabled for the global and local nodes, but not for group nodes. If you choose this command you will get opened dialog box which could contain one or more different controls depending of the tags used in the corresponding mask of the selected node. This dialog allows fine adjustment of some parameters of the mask which is described more in the Additional Information section.
Delete Magic Node - it is enabled for the group and global nodes, but not for local nodes. This command allows deleting of the selected node(s) and its corresponding mask(s). If the selected node is group node, all contained Magic nodes and corresponding masks will be removed permanently. Be careful when using this command because there is no Undo command for it.
Refresh Magic Playlist - it is enabled for any type of nodes: group, global and local, but such Magic node should be inside of the Playlists branch. Unlike regular Magic nodes outside of the Playlists branch whose filelists are updated whenever you select them, the playlists created using Position:Child qualifier of Magic Nodes have static filelists, so if you want to update their content you could use this command.
Mask Settings - if you choose this command you will get opened the Magic Nodes Settings dialog box that is very similar to the Edit Magic Node dialog box, but it has a possibility to choose mask for editing and it contains several controls on its bottom beside of the Close button, which allow different manipulations of the selected mask: the Move spin control, as well as the New, Update/Rename, Add and Delete buttons. This dialog box allows arbitrary modifications of any mask.
Manage Masks - this command opens the Manage Magic Nodes dialog box that contains a table with all available masks and it allows batch operations on several masks at the same time, e.g. Delete, Export or Import. It also has some another commands that are better used when the masks are displayed in the tabular form, e.g. Find for searching of some specific mask.
Options - when you choose this command you will get opened the Magic Nodes Options dialog box that contains some less important options that affect behavior of the add-on and/or all Magic nodes in general.
Magic Nodes Settings
The Magic Nodes Settings dialog box allows arbitrary modifications of any mask, either by typing from the scratch in the Mask text box or by using other controls from this dialog box which will construct the appropriate mask for you automatically. This dialog box is resizable, so you could enlarge it, e.g. if you cannot see the content of some control.
Caption
The topmost group of controls contains the controls that affect the whole mask. The first control is the Caption combo box which contains the list of all available MN masks and with it you could choose which mask you want to see or modify. The same combo box could be used to rename the caption of the global node of the selected mask, or to enter the new caption when creating the new mask. You could paste the whole mask in this combo box, e.g. after copying it from the Forum, but you cannot type masks from scratch in it - you should use the Mask text box on the bottom if you want to do that. The caption cannot contains the "|" and "\" characters.
Toolbar
The next two Toolbar controls allow displaying of the toolbar button for the currently displayed mask which could bring the focus to the corresponding node in the Media Tree (the corresponding qualifier is Toolbar). With the Icon and Text check boxes you could choose what you wan to get displayed on the toolbar button: the icon or the caption of the selected mask. The particular icon could be chosen using the Icon combo box when the global node is selected in the Nodes list, which will be explained latter.
Position
The Position group of controls consists of two combo boxes - with the first one you could choose the relative position of the selected mask and its corresponding node to the node that is selected in the second combo box (the corresponding qualifiers are Position and Child of respectively). The first list box is dynamically filled depending of the node that is selected in the second combo box. For example, if you choose "Magic Nodes" in the second combo box then the first combo box will contain the "First chid of" and "Last child of" items, but if you choose "Collection" then the first combo box will contain additionally "Before" and "After" items ("Before" and "After" means that the Magic node will be on the same level as the node selected in the second combo box).
Creating playlists
If you choose "Playlists" from the second Position combo box, beside of the "Before" and "After" items in the first combo box you will get also the "Child of" and "Auto-child of" items. These new items allow having of so-called the Magic playlists positioned inside of the Playlists branch, which are created when you add or modify their corresponding masks. All nodes in the Playlists branch are always sorted alphabetically and because of that there are not different the "First child of" and "Last child of" options for positioning of the nodes within that branch.
Unlike regular Magic nodes outside of the Playlists branch whose filelists are updated whenever you select them, the filelists of the Magic playlists created by using the "Child of" item are static: if you select any playlist created using this option, then select some another node and finally select the same playlist again, it will contain the same files in the filelist even if the corresponding mask has some filter which should change the contained files, e.g. if it allows displaying of the random files. To be able to update such playlist you could modify the corresponding mask somehow or you could just choose the Refresh Magic Playlist command from the menu.
However, if you choose the "Auto-child of" item from the first combo box, the playlists created using this option will be updated whenever you select such playlist, similarly to the regular Magic nodes or auto-playlists, which are updated every time when you select them. Such behavior could be preferable sometimes because you will get the playlists that are always up-to-date without worrying if you need to refresh them, but you should also keep in mind that some masks contain filters that take too much time whenever you select the corresponding node, which is not always desirable, and in that case the static playlists would be a better choice.
Unlike regular Magic nodes where their whole sub-branches are updated whenever you expand them, the sub-nodes placed in the Playlists branch cannot be automatically updated when you expand their parent node, even if you choose "Auto-child of" option, because of the limited MM API. If you want to update the whole structure of sub-folders for some Magic playlist, you should choose Refresh Magic Playlist command even for nodes/masks with "Auto-child of".
The Magic playlists have the hierarchical structure as the regular Magic nodes having the same nodes. For example, if I have the mask Test|Child of:Playlists|Position:Child\<Arstist>\<Album> I will get not only the "Test" playlist, but also its sub-playlists with names of the artists and sub-sub-playlists with the names of their albums. Be careful with the number of generated sub-playlists because too much playlists could slow down the program.
If you want to move an existing regular Magic node to the Playlists branch, but you don't want to get its sub-nodes moved to sub-playlists, you have two possibilities: you could remove the corresponding levels of sub-nodes from the mask or you could turn off the Show nodes option, but that option could be used only for the latest (bottommost) level of nodes, so that possibility is mostly applicable for masks with only one sub-level of nodes.
There are some limitations with the masks that create Magic playlists: you cannot set the Show node if empty option to the global node and you cannot set the Icon qualifier at all since the program has the fixed icon for all playlists. You could specify Sort by qualifier for a level of sub-nodes in the Magic playlists, but there is a chance that you will not get what you want, because the playlists are always sorted alphabetically (in such case consider a possibility to turn on the Show ordinal numbers option for that level).
Collection [MM4] (MM Filter [MM2-3])
If you choose the "Collection" item from the second Position combo box or any following item from its list which starts with "_", you will be able to choose a collection where you want to place the Magic node of the selected mask using the Collection combo box (the corresponding qualifier is MM filter). One Magic node cannot be placed in several collections at the same time. If you want something like that, you need to create copies of its mask with the specified different collection for each copy of that mask.
Hotkey
The Hotkey control allows the same thing as the Toolbar controls: you could bring the focus to the corresponding node in the Media Tree if you press the specified hotkey on the keyboard, e.g. Shift+Ctrl+A (the corresponding qualifier is Shortcut).
Node controls
The several next controls in the Settings dialog box allow creating of nested nodes for each level of a Magic node: group, global and local. When you select an existing mask/node from the Caption combo box, the Nodes list box will be automatically filled with all nested sub-nodes with the proper indentation for each new level. If you want to create a new mask by the click on the New button, the global node would be automatically added to the Nodes list box when you type its new caption in the Caption combo box.
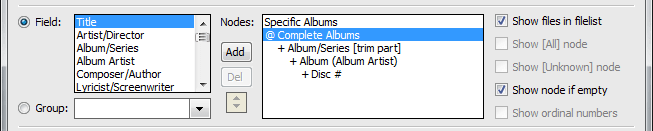
Field
The local nodes could be added to the selected mask if you choose the Field radio button and select an item from the related list box. The items from that list represents the MN fields, i.e. the predefined fields available by Magic Nodes: the simple fields, which directly correspond to the existing database fields, like "Title" or "Rating", and the complex fields, which could display one or more database fields, like "Artist - Title" or "Weeks since added".
Group
If you want to assign a Magic node to an existing group, you should choose the Group radio button and select the wanted item from the related combo box, but if you want to create a new group, which is not listed in that combo box, then just type its name in it (the corresponding qualifier is Name). The name of the group cannot contains "|", "\", "<" and ">" characters.
Nodes
The new group and local nodes could be added to the Nodes list box using the Add button located between the Filter and Nodes list boxes, after you have selected the appropriate item from the Field or Group lists. If you want to remove an existing group or local node from the mask, you should select the corresponding item in the Nodes list box and click the Del button, which is under the mentioned Add button. The spin control with the up/down buttons located bellow the Del button allows moving of the selected item in the Nodes list box in the wanted direction, i.e. up or down. Higher nodes in the Nodes list are closer to the root in the node hierarchy.
The remaining controls from the Settings dialog box, excluding the Mask text box, affect only particular node in the hierarchy of some Magic node that is selected in the Nodes list box. For example, if I have the mask Test\<Artist>\<Album> and if I want to add Statistics qualifier to the "Artist" node, I need to select the "Artist" item in the Nodes list box and then to set the Statistics controls appropriately.
Show ... controls
The first group of the remaining controls determines the display of nodes and files, but only the first check box is enabled for all nodes (group, global or local), while the other check boxes could be set only for the local nodes (unless it is stated otherwise); also many Show controls are disabled with some Split modes which will be mentioned latter in the Split by part of this section:
Show files in filelist - turn it on if you want to get displayed files in the filelist when you select the corresponding sub-node in the Media Tree (the corresponding qualifier is Show tracks).
Show [All] node - turn it on if you want to get displayed "All" node for the corresponding sub-node, similarly to the "All" nodes in the Location and My Computer folders (the corresponding qualifier is All).
Show [Unknown] node - turn it on if you want to get displayed "Unknown" node for the corresponding sub-node, similarly to the "Unknown" nodes in the "Title", "Artist" and many other built-in nodes (the corresponding qualifier is Unknown); turning off this option for the selected sub-nodes could speed up expanding of their parent nodes sometimes; this option is disabled if the Top items has some value greater than zero.
The next check box has two meanings depending of the selected sub-node:
Show node if empty is displayed if you select the global node or local node that is not the latest (bottommost) node in the hierarchy (the corresponding qualifier is Show if empty); you should turn on this option if you want to get displayed the selected node even if it doesn't have any child nodes, e.g. for the mask Test\<Album>\<Disc number|Unknown:No> you could turn this option on for the "Album" node to get displayed albums even if they contain files without disc numbers; this option is disabled if you have selected "Child of" or "Auto-child of" - "Playlist" in the Position combo boxes.
Show nodes is displayed only if you select the latest (bottommost) local node in the hierarchy; you should turn this option off if you don't want to get displayed nodes on the selected level for some reason, e.g. if the Magic node is positioned inside of the Playlists branch, while you still want that node added to the mask because it could contain some important qualifiers that affect its parent nodes even if it is not displayed like Min. files or Top items (the corresponding qualifier is Show nodes).
Show ordinal numbers - you should turn on this option if you want to get ordinal numbers of nodes in the front of their captions (the corresponding qualifier is Show rank).
Filter controls
The next group of controls allows setting of the filter for the selected mask (the corresponding qualifier is Filter). With the old versions of the add-on it was possible to set only one filter per mask to the global node, while the new version allows setting of different filters to the each level of nodes in the mask. The Filter string for the group and global levels of nodes represents the WHERE part of the SQL query applied to the whole branch of the selected Magic node, while for the local nodes it represents the HAVING part of the SQL query which is applied to the corresponding level of the query. The Filter qualifier specified to the group node will be applied to all Magic nodes belonging to that group (the group filters are AND-ed with the global filters for the particular Magic node).
Here is one example how the new Filter option could simplify masks when applied on the local level. The old mask has Filter assigned only to the global node: Files rated >= 4 stars from Artists with avg. file rating >= 4 stars|Filter:Songs.Rating >= 80 AND SongArtists.ID IN (SELECT ArtistsSongs.IDArtist FROM Songs INNER JOIN ArtistsSongs ON Songs.ID = ArtistsSongs.IDSong AND IfNull(ArtistsSongs.PersonType, 1) = 1 INNER JOIN Artists ON ArtistsSongs.IDArtist = Artists.ID WHERE Songs.Rating >= 0 GROUP BY ArtistsSongs.IDArtist HAVING Avg(Songs.Rating) >= 80)\<Artist>
The new mask has Filter assigned also to the local "Artist" node, but such mask is shorter and simpler giving the same displayed filelist: Files rated >= 4 stars from Artists with avg. file rating >= 4 stars|Filter:Songs.Rating >= 0\<Artist|Filter:Avg(Songs.Rating) >= 80>
Using this new ability of the Filter controls applied to the local nodes it is possible to easily set e.g. maximum or minimum length of song or files belonging to the selected local node. For example, if you have <Artist> node and if you set its filter to e.g. Sum(Songs.FileLength / 1048576) >= 100, you will get only Artists that have more than 100 MB in files.
The first combo box in the Filter group contains the list with the "AND" and "OR" items that you could select if you want such operators on the begin of the adding string. The next combo box is enabled only if you have selected local node in the Nodes list box and it contains list with the aggregate functions that could be used within the HAVING part of query (Count, Avg, ...). The next combo box contains list with all available MN fields, similarly to the Fields list box, but it has also one new item: "Any". If you add that item to the Filter string, you will get filtered files by any field that is specified on the Search tab in the Options dialog box.
The next combo box contains the list with operators that depends if the selected field from the previous combo box has a string, numeric or date/time value. If you have selected any string or date/time field, the last combo box in this group will be dynamically filled with all values of that field from all files (that could take significant time for complex fields); if you have selected any numeric field, the spin control would be displayed, which allows changing of that numeric value.
When you have selected all wanted items in the previously mentioned Filter controls, you could click the Add button located on the right side of the Filter group to add that construction to the main Filter text box. You could type a new filter from the scratch or modify the existing one by editing that text box. If you have selected a part of the text in that text box, you could click on the Del button to remove it, or you could click on the "(.)" button to surround the selected text with the parenthesis.
You could turn on the SQL check box that is located on the left of the Filter text box if you want to see how a MN field in the filter will be converted to the appropriate SQL field(s). For example, instead of the <Rating> MN field I would get Songs.Ratings, or instead of the <Weeks since added> I would get Cast(JulianDay(Date('now', '-6 days', 'weekday 1', '6 days')) - JulianDay(Date(Songs.DateAdded + JulianDay('1899-12-30'))) As integer) / 7. This option is not reversible, i.e. if you turn it off after a MN field is already converted to the corresponding SQL field(s), you cannot get the original MN field again.
Icon
The next control after the Filter group is the Icon combo box (the corresponding qualifier is Icon). It is enabled only for the group and global nodes, while the icons for the local nodes are automatically set depending on the related field. The selected item from the combo box determines the icon that will be displayed for the corresponding node in the Media Tree and the toolbar button if the Toolbar option is enabled for the selected mask (in which case the toolbar button will have the same icon as the global node). You could choose some of the built-in icons represented by their numbers (the built-in icons for the Glided skin with their numbers could be downloaded from here).
If you choose "Standard" from the Icon combo box, you will get displayed icon of the folder; if you choose "Top level", you will get displayed icon of the topmost local node and its related field; while if you choose "Bottom level", you will get displayed icon of the bottommost local node and its related field. Finally, you have a possibility to show your own 16x16 icon (e.g. if you find it somewhere on the Internet) if you choose "ICO file" item from the Icon combo box. In that case you should specify the location of the wanted ICO file.
Top items
The Top items control is enabled only for the local nodes. With that control you could set the number of displayed sub-nodes of the selected node (the corresponding qualifier is Top). For example, if I have "Album" node selected in the Nodes list box for the mask Test\<Artist>\<Album>, and if I set 10 with the Top items control, I could get displayed 10 albums per artist at most.
Min. files, Max. files
The Min. files, Max. files and other controls below them are enabled only for the local nodes. With the Min. files you could set the minimal number of files that are needed for display of the selected local node (the corresponding qualifier is Min tracks), and with the Max. files you could set the maximal number of files (the corresponding qualifier is Max tracks). For example, if I have the "Artist" node selected in the Nodes list box for the mask Test\<Artist>, and if I set 10 with the Min. files control, I could get displayed only nodes for artists that have at least 10 files.
Substr. start
With the Substr. start, Trim and other controls below them, you could set which part of the MN field corresponding to the selected local node you want to get displayed as its caption. The Substr. start control determines the starting position of the substring that should be returned (the corresponding qualifier is Substring start). For example, if a MN field contains "The Beatles" and if I specify 5 with that control, I will get displayed "Beatles" in the caption of the corresponding node. If the negative number is specified, the first character of the substring is found by counting from the right rather than the left, e.g. with -5 I will get "atles".
Substr. length / Trim
The next control has two captions, depending of the value set by Substr. start control. If Substr. start is zero, the next control has Trim caption; in other cases it is Substr. lenght, but in general their effect is the same (the corresponding qualifier is Trim): with that control you could set how many characters of the MN field corresponding to the selected local node you want to display from the left to the right (if the Substr. lenght value is positive) or from the right to the left (if it is negative), starting from the character specified by Substr. start. If Substr. start is zero, the result will be same as if it is 1. If Substr. lenght is zero, then the whole string is returned starting from the Substr. start in the proper direction.
Split by
The Split by group of controls allows parsing of the MN field corresponding to the selected local node: within the text box you could specify with which string you want to split the original text (the corresponding qualifier is Split by), with the combo box you could determine the mode of parsing (the Split Mode qualifier) and with the spin control you could set the optional numerical value (the Split part qualifier) if it is applicable for the selected item that is set in the previous combo box.
The Split mode combo box has the next items: String part, String Before, String After, Single Part, Parts Before, Parts After, All Parts, Categories, Odd Parts and Even Parts. The first three items that start with the "String *" don't affect the enabled state of other controls in the dialog box because they are based on the SQL code to do parsing of the MN field, but the complexity of the implemented code raises exponentially with the Split part value specified with the spin box, and for the large numbers you could even get the error message! The remaining items from the Split mode combo box don't have that problem since they are not using the SQL code, but VBScript instead. However, the drawback of the remaining items is that they cannot be used with the Sort by/Statistics qualifiers as well as almost none of the Show * qualifiers.
One important note: the ";" and "; " are not the same strings and using them in the Split by qualifier will give you different results. The detailed explanation about the qualifiers related to this group of controls with many examples can be found in the Split examples section on the web page of the old version of this add-on.
Left of
The next control has two meanings, depending of the following Right of control: if the Right of text box is empty, the first control has the Left of caption, otherwise it is Right until. It is somewhat awkward order of the controls, it would be better and more intuitive if the Right until has separate control on the right side of the Right of control, but in that case the Settings dialog box would be even larger and more overcrowded than it is now. Anyway, one more reason why this strange decision was made is because the Left of and Right of controls cannot be used at the same time, so it was quite logical to use the same controls for the Left of and Right until (the similar reasons was used with the Show node if empty and Show nodes).
With the Left of control you could get displayed the leftmost characters of the MN field corresponding to the selected local node until the specified string (the corresponding qualifier is Left of). For example, if the MN field contains "The Beatles", and if I specify "eat", I would get displayed "The B".
The Show if contain check box located under the Left of text box determines what will happen if the MN field of the selected local node doesn't contain the string specified in the Left of text box: if it is turned off, the node with the whole text of the field will be displayed; if it is turned on, there would not be displayed node for that field value at all. For example, with the same "The Beatles" field, if I specify "abc" in the Left of text box and if I have Show if contain turned off I will get "The Beatles" node, but if it is turned on I will not get any node for that field value (in that case the files by The Beatles could be found in the "Unknown" node if that node is enabled with the corresponding option). There is not corresponding qualifier for the Show if contain check box, but if you turn it on, the Left of qualifier will become Exclusive Left of.
Right of, Right until
The Right of control has the similar effect as the Left of, but it works in another direction: with it you could get displayed the rightmost characters of the MN field after the specified string (the corresponding qualifier is Right of). For example, if the field has "The Beatles" node and if I specify "eat" I would get displayed "les".
The Show if contain check box under the Right of text box has the same effect as it is the case with the check box under the Left of text box: if I specify "abc" in the Right of text box and if I have Show if contain turned off I will get "The Beatles" node, otherwise I will not get any node for that field value. Similarly to the previous Show if contain check box, if this one is turned on, the Right of qualifier will become Exclusive Right of.
If the Right of text box has specified some string, you could also specify Right until string to delimit the right end of the result (the corresponding qualifier is Right until). For example, if the MN field contains "The Beatles", and if I specify "Be" for the Right of and "es" for the Right until, I will get the node "atl". Again, similarly to the previous cases with the Show if contain check box, if this one is turned on, the Right until qualifier will become Exclusive Right until.
The strings for parsing could be specified more than once with all Left/Right of qualifiers, and they should be separated with the "|" character. Some more examples about the (Exclusive) Left of and (Exclusive) Right of qualifiers can be found in the Left of/Right of examples section on the web page of the old version of this add-on and in the mentioned PDF manual.
Sort files / Sort nodes (prefixes)
The sorting and statistics controls on the right side of the Settings dialog box can be used only with the global and local nodes, but not with the group nodes. The sorting group of controls has two different meanings depending of the selected node in the Nodes list box: if you have selected global node, this group will have the Sort files caption, but if you have selected a local node, this group will have the Sort nodes (prefixes) caption. So, with the same controls you could set both sorting of the files and sorting of the nodes independently (the corresponding qualifier is Sort by).
If you have selected global node, i.e. when this group of controls has the Sort files caption, then the first combo box in this group is disabled. When you have selected local node, i.e. when there is Sort nodes (prefixes) caption, then the first combo box is enabled and it contains the list of available aggregate functions that could be used for sorting of nodes and for creating of the multi-field captions displayed on the local nodes as prefixes to the main field selected in the Nodes list box. More about that will be described latter in the Multi-field captions section.
Beside of the standard SQL aggregate functions as Count, Avg, Max, Min and Sum, the list of sorting functions include also WAvg and Range custom functions. The Range(field) is equal to Max(field) - Min(field), while the WAvg is the weighted average that is most useful with the "Played", "Rating" and "Bitrate" fields, e.g. WAvg(Played) is same as Sum(Played * Length) / Sum(Length).
The second combo box in this group contains the list of available MN fields and that list is filled dynamically depending of some other settings. If you have selected global node in the Nodes list box (i.e. when you want to set sorting of files), this combo box contains only simple fields that have directly corresponding fields in the Songs table of the database, which are actually the same fields that you see on the column header of the main filelist.
If you have selected local node in the Nodes list box (i.e. if you want to set sorting of nodes or to set prefixes for multi-field captions), the second combo box will contain MN fields depending of the selected aggregate function from the previous combo box. If you have selected "Count" function, the second combo box will contain all MN fields that could be found in the Fields list box as well, with the addition of the "All" and "Files" items. In most cases the Count(All) and Count(Tracks) has the same effect and will return the number of files for the particular node. If you select some of the remaining functions from the first combo box (Avg, Max, ...) , the second combo box will contain only fields that are numerical (e.g. Year, Bitrate, ...). The only exception to this rule are the Custom fields that are added to this list because some users use them to store numerical values.
If you have selected blank item in the first combo box, the second combo box will contain the list with the same fields as with the "Count" function excluding the "All" and "Files" items. You could use blank item to sort nodes, e.g. if you want them sorted only by values of some field instead of some aggregate function applied to the same field, but this item is useful mainly for creating of the multi-field captions.
When you have selected the wanted items in the previously two mentioned combo boxes, you could add that construction to the list box under them by click on the Add button that is located on the right of the sorting controls. If you want to remove an item from that list box, you should select it and after that click on the Del button. If you want to move an item vertically in the list, you should select it and click on the Up/Down spin control that is located on the left side of that list. With the selected local node, the resulting value of the topmost item in the list box will be displayed first in the caption of the nodes, the value of the second item will be displayed next separated by the ", ", and so on, i.e. the resulting value(s) will be displayed on the left side of the MN field corresponding to the selected local node. The order of items in the sorting list also affects the sorting order of files (for global node) and nodes (for local nodes).
Random
You could use the Random check box if you want random sorting. If you turn on this check box while some item is selected in the previous list box with sorting keys, that item would be randomly sorted which has sense only if the item in the list was set using the blank item from the first combo box, i.e. you have specified field without aggregate function. For example, the mask Test\<Genre|Sort by: Count(All), Artist Random> will have nodes with the genres that are sorted using Count(All) as the first sorting key and after that they would be randomly sorted by artists.
Well, maybe this is not too much useful for the nodes, but you could apply the same thing to the global node to get randomly sorted files in the filelist. For example, if I have the mask Test|Sort by: Genre Random, Artist, Album Random I will get files grouped first by genres where their order will be random, then within each genre I will get files grouped by artists and their order will be alphabetical, and finally within each artist I will get files grouped by albums which will be ordered randomly.
If you turn on the Random check box while none item is selected in the list box with the sorting keys located above it, the random order will be applied to the main field of the selected local node (the corresponding qualifier in that case is Sort order:Random). For example, if I select "Artist" node in the Nodes list box and turn on the Random check box, I could get this mask Test\<Artist|Sort order: Random>.
Desc. order
If you turn on the Desc. order check box while none item is added to the list box with the sorting keys, the descending order will be applied to the MN field of the selected local node, similarly to the Random check box (the corresponding qualifier in that case is Sort order: Desc).
However, if that check box is turned on while you have any item added to the list of sorting keys, the selected item from that list will be used in descending order. For example, if I have added Max(Year) to the list box with the sorting keys, after I select that item and turn on the Desc. order check box, I could get this mask: Test\<Album|Sort by: Max(Year) Desc>, which means that the albums will be sorted by years from the newest to the oldest. In this example, the year information will be displayed on the begin of each node as a prefix to the album name separated with " - ".
Show sort key
The Show sort key check box allows toggling of the visibility for the selected item in the list of sorting keys on the captions of nodes, e.g. if you want to sort nodes using some field, but you don't want to display that field in the front of the main field (the corresponding qualifier is Show sort key). So, if I modify the previous example like this: Test\<Album|Sort by: Max(Year) Desc|Show sort key:0>, I will get albums sorted by year, but the year value will not be displayed in the front of the album name.
Statistics (suffixes)
The statistics group of controls (having the corresponding Statistics qualifier) has a very similar usage as the sorting group, but with some differences. First of all, its first combo box is enabled even with the global node, so you could choose some aggregate function applied on some field(s) to get adequate value(s) on the right side of the caption of the global node displayed inside of the parentheses. This list of functions contains one function more: "Concat", e.g. the mask Test\<Title|Statistics: Concat(Playlist)> will display the concatenated names of all static playlists in which specified title appears.
The blank item in the first Statistics combo box is not available when you have selected global node. If you choose "Count" item from that list of aggregate functions, the next combo box will contain the same fields as the corresponding sorting list with one additional item: "Items". If you add Count(Items) to the selected node in the mask, you will get displayed number of its sub-nodes. For example, if I have Test\<Artist|Statistics: Count(Items)>\<Album>, I will get displayed number of albums for each artist. Actually, I could get the same result using Test\<Artist|Statistics: Count(Album)>\<Album>, but in that case if I replace "Album" node with some another I would need to modify the Statistics qualifier as well.
Multi-field captions
As it is stated earlier, the sorting and statistics controls could be used to set prefixes and suffixes in the multi-field captions of nodes if you select the blank item from the list of the aggregate functions when you add fields to their lists. The fields that are added without aggregate functions to the list of sorting keys will be displayed as prefixes to the main field of the selected node and, similarly, the fields that are added to the statistics list will be displayed as suffixes to the main field.
For example, there is not the "Season#, Episode# - Title (Length)" predefined field, but I could get such caption on the nodes if I concatenate the existing fields with the help of the Sort nodes and Statistics controls. Firstly, I should add the "Title" field to the Nodes list box which would be the main field of the new local node that I should select. Then I need to select the blank item in the first sorting combo box and "Season #" field from the seconde combo box, and I should add that field to the list using the Add button. After that I need to do the same with the "Episode #" field. Then I should select blank item in the first statistics combo box and to choose "Length" from the second combo box. After I add that item to the statistics list box, I could get the next mask: Test\<Title|Sort by:Season number, Episode number|Statistics:Length> which will result with the wanted caption on the nodes.
Mask
The Mask text box is located near the bottom of the Settings dialog box. It displays the whole mask and its content is automatically updated whenever you modify some of the previous controls above it. However, this works in other way as well, i.e. you could type some mask from the scratch or modify some existing one in the Mask text box and the corresponding controls above it will be automatically updated. Of course, you could copy/paste any masks to that text box, e.g. if you find it posted in the Forum.
... (Choose Magic Node)
Searching the Caption combo box for a particular mask that you want to load could be very tedious task which could be avoided using the "..." button that is located on the right side of the Mask text box. If you click on it, you will get opened the Choose Magic Node dialog box that is similar to the Manage Magic Nodes dialog box containing the table with all available masks. You could find a masks in that table that contain the wanted text if you type it in the Find text box. All masks that contain the wanted text will have ticked check boxes on the left side of the table. You could jump to the next or previous mask that contains the specified text using the Next and Prev buttons. With the Match case and Regular expressions check boxes you could further refine the searching results.
If you have turned on the Modeless option in the Options dialog box, when you click on the row in the table, the corresponding mask will be immediately displayed in the Mask Settings dialog box. And vice versa, if you select a mask in the Caption combo box in the Mask Setttings dialog box, the corresponding row will be selected in the Choose dialog box. However, if you have Modeless option turned off, after you select the wanted mask in the Choose dialog box, you need to confirm that using the OK button and that dialog will be closed.
Opening the Mask Settings and Choose Magic Node dialog boxes in modeless mode next to each other allows much easier and faster navigation and editing of the masks.
"^" / "_" (toggling dialog mode)
The first button on the bottom of the Mask Settings dialog box toggles the visibility of controls in that dialog and it has two possible captions: "^" and "_". If the Settings dialog box contains all previously mentioned controls, that button has the "^" caption. However, if you click on that button it will have the "_" caption, while almost all other controls from that dialog will be replaced by just one large multi-line text box in which you could type the whole mask. This mode is useful if you want to see some long mask in full or if you prefer typing of the masks from scratch. If you click on the "_" button, all other controls from the Settings dialog box will be displayed again.
Select, Move
There are several command buttons on the very bottom of the Settings dialog box that affects the currently displayed mask. The Select button could bring the focus to the node in the Media Tree related to the current mask. The Move Up/Down buttons allow moving of the current mask up or down in the list of masks. The movement is reflected in the text on the right side of these buttons, displaying the serial number of the current mask and the total numbers of masks. If the Settings dialog box is horizontally too narrow, instead of two Up/Down buttons will be displayed one spin control.
New, Update / Rename
The New button allows creating of the new mask and it sets all controls of the Settings dialog box to their initial (blank) state. The following button has two alternate captions depending of the modifications made in the dialog: Update and Rename. If you have modified just the Caption string, that button will have the Rename caption; if you use any other previously mentioned control and modify the related qualifier, that button will have the Update caption. Actually, the resulting effect is very similar and by clicking on that button you could confirm that you want to save modifications of the currently displayed mask.
Add, Delete, Close
The Add button allows adding of the currently displayed mask to the list of masks stored in the MediaMonkey.ini file. That button is enabled only if you have created a new mask (after the click on the New button) or if you have modified the Caption, grouping or positioning of an existing mask. That means that you cannot have two or more masks/nodes with the same caption under the same parent node.
You could use the Delete button if you want to remove the currently displayed mask permanently, so be careful using it. With the Close button you could close the Settings dialog box, while the currently displayed mask will be stored in the INI file using the zero serial number (if the mask is modified, but not saved using the Update or Add buttons).
Manage Magic Nodes
The Manage Magic Nodes dialog box is similar to the mentioned Choose Magic Node dialog box with the same Find options for searching masks, but it also contains several additional controls that allow some operations on the mask(s) selected/checked in the table. There are two radio buttons on the top of the dialog box: MediaMonkey.ini and File. If you select the MediaMonkey.ini option, you will get displayed all MN masks that are stored in the main MediaMonkey INI file, i.e. the masks that have displayed the corresponding nodes in the Media Tree. In this case, you will be able to export/import masks from/to the MediaMonkey.ini file, as well as to add/edit, delete or move them.
If you choose the File option, you could get displayed masks from an external INI file, which could contain e.g. your previously exported MN masks. You could type its path in the following text box or you could click on the "..." button and find that .ini file in the new Open File dialog box. Using this option, you will be able to export/import masks from/to the specified .ini file, as well as to delete or move them (if the loaded .ini file is not marked on open as read-only).
Selecting/checking of the mask(s) on which you want to implement an operation could be done in two ways: you could use the check boxes located on the left side of the table or you could select the wanted mask directly in the table. When using the second way, you could select only one mask at the time and that way has a precedence over the first one, i.e. even if you have some or all masks checked on in the table, if you choose an operation as Delete, it will be applied only on the selected mask, but not on the checked ones.
If you want to deselect the currently selected mask, e.g. if you want to do an operation on the checked masks, then you should click again on the already selected mask to deselect it. The topmost check box could be used to toggle all individual check boxes on or off if none mask is selected. However, if any mask is selected, the topmost check box could be used to deselect that mask.
If you want to select multiple consequent rows at once, firstly click on the check box of the first row in the range to tick it on or off, then press Shift key and without releasing it click on the check box of the last row in the range.
You could sort all masks and/or groups to which they belong using the Sort by dropdown list, which has several options for sorting:
mask number - the masks will be sorted by their serial number in the .ini file (default);
node position - the masks will have the same positions as the corresponding nodes in the Media Tree, i.e. the order of masks in the list will be seamless inside their groups following the same order as it is in the tree, which could be handy to keep masks sequential, because when creating a new mask it will be placed on the end of the list, but not after the last mask from the same group;
caption in group - the mask groups will keep their existing order, but the contained masks will be sorted alphabetically by their captions inside each group;
group and caption - the mask groups will be sorted alphabetically and their contained masks will be sorted as well by their captions inside each group;
caption only - the masks will be sorted alphabetically by their captions, without regard on the name of groups to which they belong.
Let say that I have the next order of masks in the .ini file (yes, the masks could be unsorted in .ini file):
Mask2=Group_A\Node_C
Mask1=Group_B\Node_B
Mask3=Group_B\Node_A
- sorting by the mask number will produce:
Group_B\Node_B (Mask1)
Group_A\Node_C (Mask2)
Group_B\Node_A (Mask3)
- the node position will produce:
Group_B\Node_B (Mask1)
Group_B\Node_A (Mask3)
Group_A\Node_C (Mask2)
- the caption in group will produce:
Group_B\Node_A (Mask3)
Group_B\Node_B (Mask1)
Group_A\Node_C (Mask2)
- the group and caption will produce:
Group_A\Node_C (Mask2)
Group_B\Node_A (Mask3)
Group_B\Node_B (Mask1)
- the caption only will produce:
Group_B\Node_A (Mask3)
Group_B\Node_B (Mask1)
Group_A\Node_C (Mask2)
After choosing the sorting method from the Sort by dropdown list, the masks will be sorted only in the table. If you click on the table header that contains displayed the information about loaded masks, the chosen order will be permanently applied to the .ini file. This operation is not reversible, so be careful using this option and make a backup of your masks first.
On the right side of the table header is located the Word wrap check box that could be used to toggle the way how the masks will be displayed in the table.
The Find text box and the Next/Prev buttons on the bottom of the Manage Magic Nodes dialog box have the same function as the same controls in the Choose Magic Node dialog box, i.e. to find the masks in the table that contain the specified text.
The Move operation could be done only on a single selected mask at the time. Using the Up and Down buttons, you could move the selected mask in the appropriate direction in the list of masks. These two buttons have the auto-repeat possibility, i.e. it is enough to click on any of them and the selected mask will continue to move in the table until you release that button.
The next button in the Manage Magic Nodes dialog box has two possible captions: Add and Edit. It will have the Add caption if you don't have any mask selected in the table; if you click on that button, you would get opened the Add Magic Node dialog box that is the same to the Edit Magic Node dialog box, but it contains all controls set to their initial (blank) state and it allows adding of a new mask to the list of masks.
If you select any mask in the table, the mentioned button will have the Edit caption; if you click on that button, you would get opened the Edit Magic Node dialog box which is the same as if you choose such command from the context menu of a selected Magic node in the Media Tree; in this case all controls in that dialog box will be set accordingly to the selected mask, which means that you could modify the existing masks from the Manage Magic Nodes dialog box. You could also open the Edit Magic Node dialog box if you click the serial number of mask displayed in the "#" column of the table.
You could use the Delete button if you want to remove the selected/checked mask(s) from the .ini file permanently, so be careful using it.
The Save and Load buttons are similar in effect to the Export and Import buttons. The main difference is that when using the Export and Import you will be asked for the name of the target/source .ini file. On the other side, the Save and Load commands are as a kind of the Copy/Paste options, they use the intermediary file (MagicNodesMasks.ini) without asking for the name of a file.
The Export command is the same, more or less, as in the previous versions of the add-on, i.e. it allows exporting of the selected/checked mask(s). However, it is now possible to use that same command to export masks not only from the MediaMonkey.ini file, but also from the .ini file specified in the File text box (if that option is selected), i.e. you could now export files from one external .ini file to another .ini file. The same apply to the Save command, which could be used to save masks from the MediaMonkey.ini file or from the external .ini file, depending on the two topmost radio buttons.
Similarly, the Import command in the previous versions of the add-on allowed import of masks only from the external .ini file, specified in the File text box, to the MediaMonky.ini file, when the File radio button was selected. However, the new version of the add-on allows import of masks either to the MediaMonkey.ini file or to the external .ini file, depending on the two topmost radio buttons, which determines the target of import. The same apply to the Load command.
If you have selected any mask in the table, the imported/loaded masks will be inserted before the selected mask in the table, i.e. at the same position. However, if you want to import/load masks to the end of the list, you should not have any mask selected in the table.
If you choose the Import command, you will get imported all masks that are contained in the .ini file specified in the new Open dialog box. However, if you want to import only particular mask(s) from that .ini file, you cannot use the Import command, but you need to use the next two operations:
1. choose the source .ini file using the MediaMonkey.ini or File option, select/check the wanted masks and choose Save command;
2. choose the target .ini file using the MediaMonkey.ini or File option, select the position in the table where you want to import the masks and choose Load command.
If the Manage Magic Nodes dialog box is horizontally too narrow, one spin control will be displayed instead of two Next/Prev buttons, another spin control will be displayed instead of two Up/Down buttons and the Export and Import buttons will be displayed just as the "..." buttons next to the Save and Load buttons. In that case, be careful not to use the Save button instead of the following "..." button if you want to export masks to the external .ini file, because they will be saved only temporarily to the intermediary file.
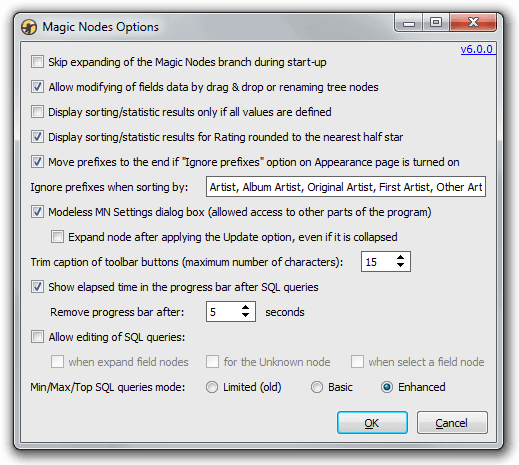
Magic Nodes Options
The Magic Nodes Options dialog box could be opened from the Edit / Magic Nodes menu or from the Tools / Extensions menu with the selected Magic Nodes item in the list of the add-ons. It contains some less important options that affect behavior of this add-on and/or all Magic nodes. The same options could be found on the General / Magic Nodes page in the program's built-in Options dialog box that could be opened from the Tools menu.
Skip expanding of the Magic Nodes branch during start-up: you could turn this option on if you want the collapsed Magic Nodes branch in the tree when starting the program.
Allow modifying of fields data by drag & drop or renaming tree nodes: you could turn this option off if you don't want to rename the field value of the selected node directly in the Media Tree or you don't want drag&drop option to be enabled for the Magic nodes. By the way, drag&drop and renaming are not allowed at all for nodes which contain only a part of the field, i.e. nodes with the Left of/Right of/Trim/SubStr/Split by qualifiers. The drag&drop operation updates fields for all parent nodes of the target node, e.g. if you have the mask Test\<Genre>\<Artist>\<Album> and if you drop selected tracks to any album node, you will get updated the genre and artist as well beside of the album.
Display sorting/statistic results only if all values are defined: you could turn this option off if you want to get sorting/statistical values on the caption of the Magic nodes even if some files don't have defined the affected field value. For example, if the mentioned option is turned on, the mask Test\<Album|Sort by: Avg(Rating)> only displays the average rating in the front of the album names for the albums where all tracks have been rated; for the other album nodes, just the album names are displayed. So, you should turn off the mentioned option if you want to display these rating values even for those albums which only have some tracks rated.
Display sorting/statistic results for Rating rounded to the nearest half star: you could turn this option off if you don't want to get displayed ratings using sorting/statistics qualifiers rounded to the nearest 0.5 stars.
Move prefixes to the end if "Ignore prefixes" option on Appearance page is turned on: if you turn this option on, the prefixes will be moved to the end of the node captions, e.g. "The Beatles" will be displayed as "Beatles, The"; if you turn it off, the fields will be displayed as they are stored in the database, e.g. "The Beatles", but the sorting of the nodes will be still correct as if the prefixes are moved to the end, with "The Beatles" node inside of the "B" branch; in both cases it is assumed that the Ignore prefixes option on the Appearance page is already turned on.
Ignore prefixes when sorting by: within the following text box you could specify which MN fields should have ignored prefixes when displaying those field on the captions of the Magic nodes. The field names should be typed manually separated with the "," character.
Modeless MN Settings dialog box (allowed access to other parts of the program): you could turn this option on if you want to get modeless Magic Nodes Settings dialog box, which could allow access to the other parts of the program, e.g. you could navigate through the Media Tree with the already opened that dialog; when that option is turned off, the mentioned dialog box will be modal and you need to close it if you want to use the other parts of the program.
Expand node after applying the Update option, even if it is collapsed: you could turn this option on if you want to get expanded the corresponding node of the currently displayed and edited mask in the Settings dialog box after you click on the Update button.
Trim caption of toolbar buttons (maximal number of characters): you could set the maximal number of characters that can be displayed in the toolbar buttons of Magic nodes (if the related option is used in the masks).
Show elapsed time in the progress bar after SQL queries: you could turn this option on if you want to get displayed the progress bar on the bottom of the main window of the program with the information about the time that is elapsed after a Magic node is expanded or selected.
Remove progress bar after: you could set after how many seconds you want to get removed the progress bar that is displayed using the previous option.
Allow editing of SQL queries: you could turn this option on if you want to see or edit the SQL queries when you expand and/or select Magic nodes:
when expand field nodes: e.g. if you have the mask Test\<Artist> and you expand the "Test" node, you will get opened the Magic Nodes SQL Editor dialog box displaying the SQL query that is used to generate all artist nodes.
for the Unknown node: if you expand the "Test" node of the mentioned mask, you will get the same dialog box displaying the SQL query that is used to generate the "Unknown" artist node, i.e. the node that contains files with the unspecified Artist tag.
when select a field node: if you select any sub-node of the mentioned mask, e.g. "The Beatles", you will get the same dialog box displaying the SQL query that is used to generate the filelist for that field value, i.e. the files of the Beatles.
Min/Max/Top SQL queries mode: option that determines how to construct SQL queries for masks with the Min/Max and Top qualifiers:
Limited (old): this mode has similar algorithm to the freely available version with some bug-fixes and improvements and it works even in MM2, but it is still limited to the masks that have the Top qualifier only on the first (leftmost/topmost) sub-level of global node, which means that e.g. you could get correct results (displayed files/nodes and their stats) only for <Artist|Top:5>\<Album>, but not with <Artist>\<Album|Top:5> nor <Artist|Top:5>\<Album|Top:3>;
Basic: - this mode has similar algorithm to the previous enhanced MN5 versions of the add-on with some bug-fixes and improvements; it doesn't have limitation on the Top qualifier, but it requires MM v3.1+ and it could be terribly slow with some masks; for example, the mask <Sample rate>\<Title|Top:5> lasts about 65 seconds when selecting/expanding it with my test database, while the next mode lasts only one second;
Enhanced: - this mode is recommended for use since it is highly optimized for speed; it doesn't have limitations on the Top qualifier, but it requires MM v3.1+.
The first two modes are included only for testing purposes if you find the third one buggy, and maybe they will be removed in the future versions of the add-on.
Auto-DJ using Magic Nodes
There is one option related to the Magic Nodes that is not available in any mentioned dialog boxes, not even in the Magic Nodes Options dialog box. It is located on the Player / Auto-DJ page in the Options dialog box that could be opened from the Tools menu and it could be used to set a Magic node as the source for Auto-DJ. You could choose the "Magic Nodes" item from the Add files from combo box and after that you could select a MN mask from the combo box that is located under the previous one, or you could click on the "..." button from the right side of that combo box and you will get opened Choose Magic Node dialog box where you could find the mask that you want to use for Auto-DJ.
If you select a Magic node in the Media Tree and choose the Adjust Magic Node option from the menu you could get something like this (the dialog could be resized):
Using this option it is much easier to adjust some parameters of the existing masks than modifying them in the Filter area of the Settings dialog box - just move the corresponding slider or use the spin control. To allow this the add-on uses the new tags with the syntax similar to those that are already implemented in the RegExp Find & Replace add-on. Here is what you need to add to the existing mask to get the Adjust dialog box on the screenshot:
<Group|Name:Album Ratings|Show tracks:No>\(Complete) Albums with (weighted) avg. file rating >= <ID:3> stars|Icon:Top level|Filter:Songs.IDAlbum IN (SELECT IDAlbum FROM Songs WHERE Rating >= 0 <If|Caption:Only complete albums having number of files equal to maximal track #|Value=1|ID:1>AND Songs.IDAlbum IN (SELECT IDAlbum FROM Songs GROUP BY IDAlbum HAVING Count(*) = Max(Cast(TrackNumber As integer)) AND Count(*) >= <Number|Caption:Min. number of files per album|Value:5|MinValue:1|MaxValue:20|ID:2>) <End If>GROUP BY IDAlbum HAVING <If|Caption:Average file rating weighted by track length|Value:1>Sum(SongLength * Rating) / Sum(SongLength)<Else>Avg(Rating)<End If> >= <Number|Caption:Min. rating (stars)|Value:4|MinValue:0|MaxValue:5|ID:3> * 20)\<Album with Album Artist|Statistic:Count(All), Avg(Rating)>
The parameters that could be used for adjustment are:
Min tracks, Max tracks and Top qualifiers;
String, Number, If, Else, End If and ID tags inside of the Filter qualifier.
As you could see from the screenshot, the <Number> tag is displayed using spin/slider controls. The <If> / <End If> construction is represented using check box that is checked if the Value argument of <If> tag is 1. The <String> tag (that is not included in the previous mask) would be displayed as a text box.
The syntax of tags is: <tag_name|Value:"text"|Caption:"text"|ID:number|MinValue:number|MaxValue:number>
The Value argument is mandatory for <String> and <Number> tags, the other arguments are optional.
The Caption argument is also optional, but it could display some descriptive text next to the control.
The MinValue and MaxValue could be used only with the <Number> tag to specify a range of the spin control.
The <ID> tag allows variables to be used several times in the Filter and should have only one argument, e.g. <ID=1>.
That tag will be replaced in query during run-time with the Value argument of some another <String>/<Number>/<If> tag with the same ID argument.
The ID argument could be also used to specify order of controls in the dialog box.
The <If> tag has three different forms:
1) The standard one is when you specify the Caption and Value arguments. It could have have 0 and 1 as a Value argument, or "False" and "True".
If the Value is 1, the text between <If> and <End If> tags will be included in the Filter query; otherwise, if the Value is 0, the text will be omitted.
If the Value is 1 and if <Else> tag is specified between <If> and <End If> tags, then only the text between <If> and <Else> tags will be included in the Filter query, but the text between <Else> and <End If> tags will be omitted; if the Value is 0, the text between <If> and <Else> tags will be omitted and the text between <Else> and <End If> tags will be included.
If you use the <Else> tag without the Caption argument, the whole <If> <Else> <End If> construction will be displayed as a check box in the Adjust dialog box. However, if you specify the Caption argument in the <Else> tag, the same construction will be displayed as a group containing two radio buttons; the first button will display the Caption specified in the <If> tag, and the second one will display the Caption specified in the <Else> tag.
The <If> tag in the first form could have specified ID argument as well.
2) The second form of the <If> tag is when you specify only ID argument. In this case it could be treated as if it has the Value as another <If> tag with the same ID argument that has specified the Value argument. The second form (with only ID argument) is not displayed in the Adjust dialog box as any control, but its nested controls/tags will be displayed next to the controls/tags contained in the corresponding <If> tag that has specified the Value argument.
3) The third form is when you specify the Value argument without the Caption argument. This form will not be displayed in the Adjust dialog box either. It is mostly useful if you want to specify some VBscript expression in the Value argument, e.g. <If Value="Len(""<ID:2>"") > 0"> ... <End If>, which will have included/excluded text in the Filter query depending of the result of that expression.
The <End If> tags should not have any specified argument.
The text between <If> and <End If> tags could contain another tags which would have corresponding controls enabled if the Value of <If> tag is 1. The text between <If> and <End If> tags could contain even another <If> / <End If> blocks, which means that they could be nested without any limit on depth.
There is no limit for the number of tags and corresponding controls per mask. Adding those new tags is optional. If you don't add them, your masks will be as before, but without possibility to adjust them using the new Adjust Magic Node menu item. The masks with new tags are longer and somewhat harder to write, but you could do that just once and after that their adjustment will be child's play. Of course, many predefined masks are already written with such new tags so you could use them out of the box.
Here is one more example:
<Group|Name:Random|Show tracks:No>\<ID:1> Random files (rated <ID:3> stars or more) from each Artist (having at least <ID:5> files)|Icon:Top level|Filter:Songs.ID IN (SELECT Songs.ID FROM Songs, (SELECT IDArtist FROM ArtistsSongs WHERE IfNull(ArtistsSongs.PersonType, 1) = 1 GROUP BY IDArtist<If|Caption:Show only artists that have at least the specified number of files|Value:1|ID:4> HAVING Count(*) >= <Number|Caption:Minimum of files|Value:5|MinValue:0|ID:5><End If>) AS T1 WHERE Songs.ID IN (SELECT Songs.ID FROM Songs, ArtistsSongs WHERE Songs.ID = ArtistsSongs.IDSong AND ArtistsSongs.IDArtist = T1.IDArtist <If|Caption:Show only if files are rated more or equal than the specified number|Value:1|ID:2>AND Rating >= <Number|Caption:Rating (stars)|Value:3|MinValue:0|MaxValue:5|ID:3> * 20 <End If>ORDER BY Random() LIMIT <Number|Caption:Files per artist|Value:2|MinValue:0|ID:1>))|Sort by:Multi artist Random\<Artist>
The color highlighting of tags is not implemented in the add-on. I used it here just to show what is added.
Important info about upgrade from v4
With the previous versions of the add-on, the Filter text box contained WHERE part of the SQL expression for the whole mask, i.e. it was always displayed no matter which node is selected in the Nodes list box, although it was assigned only to the global node. However, with this version the Filter qualifier could be assigned also to any local field/node selected in the Nodes list box containing the corresponding HAVING part of the SQL expression. So, with this version you need to select the global node in the Nodes list box if you want to see the WHERE part of the Filter expression which would be applied to the whole mask.
The Show tracks qualifier has No as default value (when it is unspecified) for nodes on the Group levels, which is different from the previous versions where Yes was default. If you have some old masks without specified that qualifier on the group levels, then you should update them appropriately. Fortunately, with the enhanced version of this add-on it is enough to update the mentioned qualifier only to one mask and all other masks within the same group will be updated automatically.
In the enhanced version, the backslash ("\") character doesn't need to be escaped inside of the Left of, Right of and Split by qualifiers with one additional "\" character. For example, instead of "c:\\My Music\\" now it should be "c:\My Music\". If you have your own created masks with escaped backslash characters, you should update them with removed escapes.
The Show sort key qualifier is changed to support multiple fields of Sort by qualifier as prefixes. All old masks with Show sort key qualifier with value greater than 2 will not show the wanted results, so you should update them appropriately. The first three values has the same behavior as before:
0 = don't display any field as prefix;
1 = show only first specified field;
2 = show only second specified field.
The old behavior:
3 = show only third specified field;
4 = short only fourth specified field;
5 = show only fifth specified field, and so on.
The new behavior:
3 = show only first and second specified fields;
4 = show only third specified field;
5 = show only first and third specified fields, and so on.
As you could guess, the new value is using the bitwise representation of fields, which means that the lowest bit represents the first field, the next bit represents the second field, and so on. However, you don't need to do any bitwise operation by yourself - you could just turn on the Show sort key check box in the Settings dialog box for those fields that you want to get displayed and the corresponding value will be added to the mask by the add-on automatically.
The Show sort key qualifier now supports -1 as the valid value which means that all specified fields of Sort by qualifier will be displayed. That value is default when the mentioned qualifier is omitted from the mask, which is one more thing regarding to that qualifier that is changed in the new version - its default value was 1 in older versions, i.e. only the first specified field was displayed with the omitted Show sort key qualifier.
The Sort order: Random qualifier specified on a node at the local level was used for sorting of both sub-nodes of that node and the files in the filelist. In the new version only sub-nodes are randomly sorted in that case. If you want to apply random sorting order to the filelist you could specify Sort order: Random to the global node, or you could use Sort by qualifier applied to the global node with Random quasi-sorting order specified to any supported field, e.g. Sort by: Genre Random.
There are some new keys in the [MagicNodes] section of the MediaMonkey.ini file for some less used options that are not represented in GUI:
BitrateNodeRange - nodes displaying Bitrate are grouped by their range of bitrates, default value is 16 which means that there would be displayed nodes: 16 kbps, 32 kbps, 48 kbps, and so on;
FormatSeasonEpisodeNumbers - if this key is = 0 the Season# and Episode# nodes will be displayed as they are stored in the database, if it is = 1 then these nodes will be displayed as "Season #xx" and "Episode #xx", default value is 1.
This add-on is a false positive reported as a worm by F-Secure. The author of F-Secure promised me that will update its database and put the add-on on the white-list, but still didn't. If you go to the www.virustotal.com/en/ site, you will see that it is safe tested by 54 popular anti-virus engines; the only one reporting a worm in it is F-Secure. By the way, the F-Secure was constantly having the largest number of false positives in last few years according to the Real-World Protection Test by AV-Comparatives.